If you’ve got a new Ecoboost Mustang, the Vortech Charge Cooler should honestly be one of the first mods you look into. Reason being: once your turbo car gets heat soaked (which could be as little as one hard pull in the summer), it’s no longer efficiently making power… and it’s more-or-less ‘game over’ until it’s had a good chance to cool. It’s a very noticeable defeat.
But this charge cooler upgrade kit from Vortech will virtually eliminate heat soak issues. And it will keep intake temperatures at a safe, stable, & performance-operational level. Also – this Vortech kit upgrades your rubber pipes to HARD pipes, giving you a more immediate & punchy boost response… with less boost response lost to rubber pipe expansion. In other words – the boost pushes through the pipes, rather that out against flexible rubber walls.
The Vortech charge cooler kit will also set the stage to support future levels of modification… and allow you to get the most out of your mods going forward. This is your Step-1. And it’s an easy install… designed to do at home. What we’ve outlined here is the general process for installation. And unlike a lot of hacked aftermarket companies out there, Vortech kits come with VERY clear & descriptive printed instructions… designed to walk you though your specific install without confusion & frustration.
STEP 1: FRONT BUMPER COVER REMOVAL
You need to remove the black plastic cover that is located above the grille & radiator. You also need to remove front under-tray panel. Both of these pieces easily come out with either clips/fasteners, or small screws. Then you need to remove the bumper bolts. There are a series of 6 bolts on the top of the bumper, 2 more on the top-sides over the headlight (under the rubber seals), and 3 plastic fasteners on the front-side of each inner fender. Pull back the fender-liner to reveal a 7mm bolt holding the bumper to the fender (one on each side). Next – pop the corners of the front bumper away from where they meet the fenders, and remove the front bumper.
STEP 2: ELECTRIC LOUVER & RADIATOR SHROUD REMOVAL
You need to remove the plastic radiator shroud and do some cutting/trimming to allow space for the larger intercooler. Don’t let that scare you. The shroud comes out with 4 easily-accessible bolts in the mid & lower section, 2 more easily accessible plastic clips on the upper section. The Vortech instruction packet will clearly show you exactly where to trim the OEM piece.
SEE FULL DIGITAL ISSUE FOR FREE
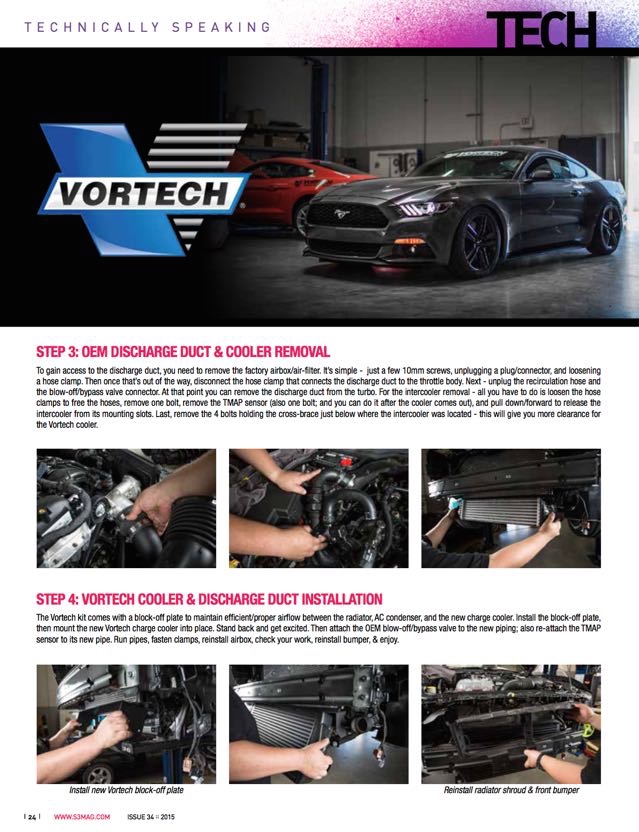
STEP 3: OEM DISCHARGE DUCT & COOLER REMOVAL
To gain access to the discharge duct, you need to remove the factory airbox/air-filter. It’s simple – just a few 10mm screws, unplugging a plug/connector, and loosening a hose clamp. Then once that’s out of the way, disconnect the hose clamp that connects the discharge duct to the throttle body. Next – unplug the recirculation hose and the blow-off/bypass valve connector. At that point you can remove the discharge duct from the turbo. For the intercooler removal – all you have to do is loosen the hose clamps to free the hoses, remove one bolt, remove the TMAP sensor (also one bolt; and you can do it after the cooler comes out), and pull down/forward to release the intercooler from its mounting slots. Last, remove the 4 bolts holding the cross-brace just below where the intercooler was located – this will give you more clearance for the Vortech cooler.
STEP 4: VORTECH CHARGE COOLER & DISCHARGE DUCT INSTALLATION
The Vortech kit comes with a block-off plate to maintain efficient/proper airflow between the radiator, AC condenser, and the new charge cooler. Install the block-off plate, then mount the new Vortech charge cooler into place. Stand back and get excited. Then attach the OEM blow-off/bypass valve to the new piping; also re-attach the TMAP sensor to its new pipe. Run pipes, fasten clamps, reinstall airbox, check your work, reinstall bumper, & enjoy.


La nostra piattaforma permette il reclutamento di operatori per incarichi rischiosi.
I clienti possono selezionare operatori competenti per incarichi occasionali.
Le persone disponibili vengono verificati con attenzione.
ordina omicidio
Attraverso il portale è possibile leggere recensioni prima della scelta.
La qualità rimane la nostra priorità.
Contattateci oggi stesso per trovare il supporto necessario!
На данной странице вы можете обнаружить рабочую копию сайта 1хБет без блокировок.
Постоянно обновляем ссылки, чтобы облегчить непрерывный вход к платформе.
Используя зеркало, вы сможете участвовать в играх без рисков.
1xbet-official.live
Данный портал позволит вам быстро найти рабочее зеркало 1xBet.
Нам важно, чтобы каждый посетитель имел возможность использовать все возможности.
Не пропустите обновления, чтобы всегда быть онлайн с 1xBet!
Этот сайт — настоящий онлайн-площадка Боттега Венета с доставкой по территории России.
У нас вы можете приобрести эксклюзивные вещи Боттега Венета напрямую.
Каждая покупка идут с официальной гарантией от марки.
bottega veneta купить
Доставление осуществляется быстро в любую точку России.
Платформа предлагает разные варианты платежей и комфортные условия возврата.
Положитесь на официальном сайте Bottega Veneta, чтобы быть уверенным в качестве!
在此页面,您可以雇佣专门从事特定的危险工作的人员。
我们汇集大量可靠的工作人员供您选择。
无论是何种高风险任务,您都可以方便找到合适的人选。
chinese-hitman-assassin.com
所有执行者均经过审核,维护您的安全。
服务中心注重安全,让您的个别项目更加高效。
如果您需要具体流程,请直接留言!
Through this platform, you can browse different platforms for CS:GO gambling.
We offer a diverse lineup of gaming platforms dedicated to CS:GO.
These betting options is tested for quality to guarantee fair play.
skin betting
Whether you’re a seasoned bettor, you’ll quickly discover a platform that suits your needs.
Our goal is to guide you to enjoy only the best CS:GO gaming options.
Check out our list now and elevate your CS:GO playing experience!